Monday 31 December 2012

2012 in Review

January

- Zim's birthday
- We bought our first brand-new piece of furniture: a sectional couch with a hid-a-bed for company.  Likely not a big deal to anyone else, but as we've both moved so much in the previous 4  years, it gives us both a feeling of permanency and domesticity.

February

- Mandi's birthday
- Big snowstorm; we got the truck stuck in a 4-foot high snowbank at the end of the driveway.  Oh my, what are we going to do when we don't have a landlord to clear the driveway in situations like this...
- Project: We dehydrate some apples with our new dehydrator.  Mmmmmmmm, delicious!

March

- Project: Mandi creates a reversible wallet.

April

- We start seedlings for the garden.  These end up being planted in pots and buckets.

May

- We decided to go see a mortgage broker, "just out of curiosity", which set of a an unexpected chain of events.
- Projects: Fleecy bunnies for Mandi's goddaughter and her siblings and a ring in a box for their Mom; a pallet becomes a tool organizer.

June

- Our first wedding anniversary
- Jordan's birthday
- Projects: a new easy-pour lid for the baking soda jar; a wallet for a friend; a collar for Mander; rosebud earrings and ring, and holder, for the Rescue's silent auction.

July

- We bought Lone Pine Farm!!!!
- Mandi's been volunteering for one year.
- We headed off on a three-week vacation, stretching well in to August, to visit family in Alberta and Ontario.  This vacation was planned waaaaaay back in February, and there was no way we were going to postpone it.
- Projects: clothesline in the barn.

August

- Molly and Anomander's birthdays
- Jordan's brother Aaron comes home with us; we break the trailer for the quad so we buy a new, hardier one.  Aaron spots a beautiful double rainbow over the barn - I run out to take photos.
- We start a blog to keep our friends and family up-to-date.
- Projects: we start excavating the crawlspace with Aaron's help.

September

- Mandi makes a quick trip back to Alberta to see Linkin Park in concert :)
- We find the stream, complete with beaver dam and fallen log.
- Doodle comes out for their first playdate!
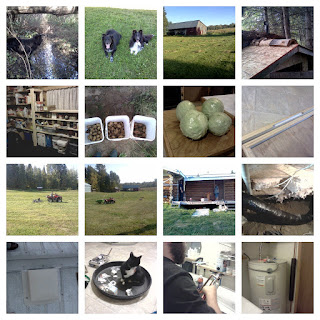
- Projects: Jordan starts painting the stalls side of the pole shed; Mandi builds a shelf for food storage; the garden is harvested; the roof of the vestibule for the root cellar is replaced; Mandi's parents come up and many things get done: the grass is cut and raked, the drawer fronts are routered, the dryer vent is hooked up, the hot water tank is installed, and new roof vents are installed as well; Mandi later installs another vent.

October

- We've now known each other for 13 years.
- It's cold enough that we turn on the fireplace.
- Projects: Jordan paints some fences; Mandi bakes some pies and crochets some dishcloths; we install a makeshift soffit to add more ventilation to the roof and a better outside light; Mandi installs some sink-front storage and builds a shoe shelf.

November

- Let the baking begin!
- We attend the Barnyard Business session, and meet Tessa.  This session will change our lives.
- Projects: Jordan starts organizing the shop by emptying out and reorganizing the toolbox; we prop up the back corner of the roof; Mandi's friend comes out and helps with the electrical.

December

- We meet with Tessa and Matt to chat about farming
- The roof starts to leak during warmer weather.
- Projects: Mandi bakes cookies; we set up the bookcases; we make some plans for the chicken coop.

Saturday 29 December 2012

Cookies!


Hi everyone :)

Sorry for the lack of posts, I have been enjoying some extended time off from work by being uncharacteristically lazy.


Here's what we have accomplished since I last posted:
- We measured a possible yard site for the chickens, as the current coop is unsalvageable (and unsanitary!)  Based on our calculations, we can have 36 chickens in 4 runs, or 32 chickens in 6, if we do a permanent, year-round coop with rotating runs.  Next step: plan the coop.
- We measured the 'dip' in the yard for a potential garden: 30m by 55m, which works out to about 0.4 acres.  I thought it was bigger than that!  No biggie though.  New we'll just watch in the spring and see if that area drains well enough to feasibly put in a garden.
- I rotated the bins for the worms (yes, we have worms, for vermicomposting, they work quite well although on a very small scale).  Luckily, they're nearly indestructible - feed them, ignore them for 3 weeks, come back and feed them again.  My kind of pet :)
- I did more baking - three batches of cookies!  At my work, we do a cookie swap for Christmas (instead of trying to purchase little trinkets for each other), so I did 2 dozen for my coworkers in my department, with loooooooooots left over to give to others, and for us to eat!  In my opinion, these are the best oatmeal cookies ever - I usually make them with cranberries for the fruit and white chocolate chips for myself and for others, and with just semi-sweet chocolate chips for Jordan.  The recipe is below.
- We also have Doodle for an extended playdate right now!  He and Zim are having a blast running around outside, wrestling over the toys, and chasing each other through the house.

Zim and Doodle, wrestling in the snow
Other than that, it's been a quiet Christmas.  As it was just us two here, and we're not terribly big in to Christmas, we've just been hanging out and being lazy.  Jordan has had the sled out a few times, and we let the cats go outside Christmas day - something that they've been asking for for a while.  Mander was happy to sit in the snow for about 10 minutes, but Moly was thoroughly unimpressed and wanted to go back inside after just a minute.

Clockwise from top left: Jordan on the sled - that black blur right behind him is Zim; The kids curled up on the bed after we rearranged the bedroom so we could turn on the electric heat; Measuring the garden site; Mander quite happy in the snow; Molly wants in!  She's growling by this point; Zim is perfectly fine outside, of course.
Anyway as promised, the recipe:

Awesome Oatmeal Cookies!

Ingredients:
1 1⁄2 c flour 
1 tsp baking soda 
1⁄2 tsp salt 
1⁄2 tsp cinnamon 
2 1⁄2 c old fashioned oats 
1 c unsalted butter, lightly softened 
1 c light brown sugar, packed 
1⁄2 c granulated sugar 
2 lg eggs 
1 Tbsp honey 
2 tsp pure vanilla extract 
1 1⁄3 c dried fruit (cranberries, raisins, blueberries, apples, etc.) (optional)
1 c chocolate chips (white or semi-sweet) (optional)

Directions: 
1. Preheat oven to 350 degrees F. 
2. Line 2 cookie sheets with parchment paper (or use non-stick cookie sheets). 
3. In medium bowl, mix flour, baking soda, salt, cinnamon and oats. Set aside. 
4. With an electric mixer, beat the butter and both sugars until light and fluffy. 
5. Beat eggs in to the sugar mixture one at a time. 
6. Add honey and vanilla to the sugar mixture and beat until blended. 
7. Add the flour mixture to the sugar mixture in two batches, beating each time until well combined. 
8. Stir in the cranberries and chocolate chips. 
9. Drop heaping Tbsp of dough on to baking sheets about 2 inches apart. 
10. Bake until the centers of the cookies are soft, about 9 to 11 minutes. 
11. Let cool for five minutes on the cookie sheets, then transfer them to a wire rack to finish cooling.


Saturday 15 December 2012

This week at the Rescue

This week, I had a nice, busy afternoon at the Rescue.

I started off with mixing the evening rations for Darcy and Fin.

Then I got to hang out with Hamilton for a bit, and feed him treats.  He continues to make progress: he let me touch his cheek without losing his mind!

Hamilton scoping out a treat

After chilling with Hamilton, I headed out to trim Jack's bridle path (which involves trimming a small section of his mane to allow the halter or bridle to fit properly).  When I finished Jack, I led Delta out for a tail wash and braid, and mane detangle, and a new bridle path for her as well.

Delta, who is one of the bigger horses at the Rescue.

Then I got to bring Shaw out for a quick groom and some treats :)

Looking handsome!

Friday 14 December 2012

Snowfall Warning!

Yesterday, we had a surprise snowfall warning for 10-15 cm.  I say 'surprise' as I didn't know about it until I woke up yesterday morning and saw 3 inches of fresh snow on the car.  As we had already had a previous 3 inches on the road, I skipped breakfast and headed out to make a few quick passes with the plow.  This was not nearly enough to adequately clear the road, and I nearly got stuck leaving for work.  Jordan also almost got the truck stuck coming home, and he was in 4x4!  To top it off, I had accidentally brought the quad key with me to work, so Jordan couldn't plow.  As the snow continued to accumulate, I called a local gent who owns an excavating company and arranged to have him come out with his loader in the afternoon.  While yes, we could have cleared the drive with the quad, and yes, me pocketing the keys cost us at least $75 in loader costs, I'm kind of glad that we got the loader out, as the road is still just as wide as it was, and now I know not to make that mistake again!  I still had a bit of clearing to do when I got home, as the loader didn't go all the way to the shop (and I don't mind that he didn't - we now have 3 logs lost in the snow over there, and I would have felt terrible if he had hit one and damaged the loader in some way... we'll have to mark them this weekend), but it only took about two hours, including replacing one bolt and four nuts that hold the snowblade on the quad.  All in all, better than the likely 4 hours it would have taken to do the road and the shop.  On the bright side, now we get the pleasure of watching Zim leap through the snow and sink up to his shoulders - he's never had the chance to play in snow this deep, as we very rarely used the 'backyard' in our previous house since it was so small and riddled with trees and random divots, and it was easier for Zim to play in the driveway (where there was enough room to throw the ball without it going over a fence or getting lost in the bush).

So, what else have we been up to?

Two weeks ago we finally unearthed the bookcases and books from the longhouse, and brought them in.  Last weekend, I got the last of them filed properly, so we now have access to our books again! We have three shelves: the large 5-shelf bookcase is fiction; the medium three-shelfer is movies, games, and some non-fiction (biography, trivia, artsy stuff, etc.); and the final 2-shelf bookcase is the rest of the non-fiction (cookbooks, household and health, home improvements, homesteading, gardening, farm tales, and animals).

Of course, there's nothing going on at the moment for farming, but we're hoping to sit down over Christmas and figure out what we'll do next year, including where we'll put in a bigger garden.  Gee, that sounds familiar; didn't I say that a few weeks ago?  We've been busy running around in town, cleaning, trying to get the house a bit more organized, and generally enjoying our few weekends off together.

On the agenda for this weekend: make dog food, a Christmas party with coworkers, cleaning the workout room in the longhouse, and baking lots and lots of cookies :)

Wednesday 5 December 2012

This week at the Rescue

This week was all play and no work!  Nicola and I went for a nice ride through the bush, where I actually trusted Delta to not buck me at the slightest provocation (not that she has the gusto to toss someone anyway - she's pretty chill, and is a verrrrry slow walker).  Thus, I actually gave her rein to move, and did my best to steer her so she couldn't scrape me off on a tree (though she tried twice anyway).  I even got her to trot a few steps without me falling off!  Ha!  That's progress, friends :)

Anyhoo, as promised, daylight pictures:
Darcy.  Isn't he in much better shape?!!  What a fine looking fellow :)

Finigan, who must be part Arctic Hare - he's got a white undercoat and a brown topcoat.

Darc and Fin

Gracie, who can smell treats from 200 paces

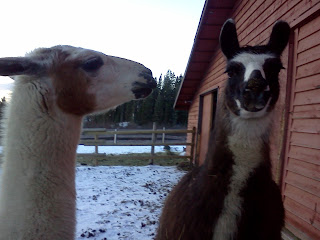
Two of the llamas: Bailey on the left and Sarah on the right.

Amy, who continues to make amazing progress.  She let me hold her halter twice, and pet her neck once.  Fabulous girl :)  Nicola has been working with her twice a day, and she gets socialization with us volunteers too.

John Boy, still feeling sorry for himself after being gelded a few weeks ago.

This guy has the coolest eyes I've ever seen....

... his left eye is both brown and blue!  It's split pretty much perfectly down the middle... awesome :)

Tuesday 4 December 2012

Random How-To: Making binder dividers from file folders

My Dad is a mechanic and a pretty skilled backyard handyman, and my Mom is good at various needlecrafts (sewing, embroidery, crochet, and knitting, among others - she once sewed zippers into the sides of Dad's coverall legs so he could take them off without getting hung up on his boots - what a clever couple!), so us kids grew up getting involved in projects to create something needed and useful out of whatever we had on hand, or with minimal purchased materials.  I've always enjoyed doing this as well, and it's come in very handy; I got 100% on a Hamlet created out of welding rod and a brake rotor for my English class in high school (though I'll happily admit that Dad and Bob did all the welding, while I was "creative designer").  Every now and again, I'll try to showcase some of my upcycling and transforming as a Random How-To.

This project grew out of a lack of binder dividers at work.  I was trying to organize a large amount of paperwork and information on copyright one day, and the only dividers left in the supply cabinet had been cut out of cardstock.  I was totally fine with this, but I discovered that the four in there were not enough for my project.  I had noticed a few file folders in the recycling earlier in the day, and I decided to improvise some more dividers out of those.  When I recently decided to reorganize our recipe binder, I knew I would need more dividers.  I have found that mass-produced dividers, especially ones big enough to use with page protectors, are very expensive (to me, anyway).  So I headed to our local Value Village to see what I could find.  Being November, they were pretty short of office supplies, but I was able to find one package of regular dividers accompanied by about 8 manila folders for $1.99.  Perfect!  Here's how I turned those folders into binder dividers:

Supplies needed:
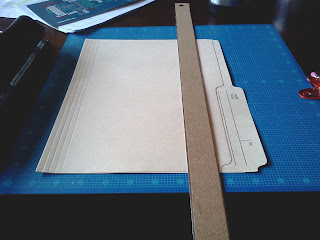
Cutting mat and knife (or scissors, if you have the patience!), ruler, hole punch, folders.

Note: I am right handed, so in every photo, I will be cutting on the right side of the ruler.


Line up the folder along one of the lines on the cutting mat, if yours has a grid.  If not, measure the distance along the shortest side from the folded edge to the top of the folder.  In this case, it would be the top flap of the nearest edge in the picture above.  Mark that measurement on the other edge of the flap, and line up the ruler.


Cut the top part of the folder off.  You should now have two straight edges.


Place the ruler diagonally across the folder.  Cut.


Now take the section with the folded edge, and cut off the fold so you now have two loose triangles of manila, just like the other side.


Line up the right angle in the hole punch, and punch some holes :)  These dividers need only two holes (not three) to work.  If you want reinforced holes, simply add a piece of packing tape down the edge to be hole-punched before punching the holes - this will eliminate the need for paper reinforcements in the future.


Using a piece of paper (or a page protector) as a guide, determine how long your tabs need to be.  They should be at least half an inch longer than the paper.  Cut off the point of the triangle.


Here's the finished product!  These tabs were made using a page protector (while the ones made in the tutorial above used a sheet of paper) as a guide, so they stick out far enough to read and grab.  Simply alternate their direction - one tab at the top, one tab at the bottom.  Here I've used colour-coded sticky notes as labels.  These are inexpensive (especially if you can find folders at a local second-hand store) and are fully customizable - doodle on them, write on them, cover them in pictures, use different coloured folders - the options are limitless :)